Making Baby Food

As you can imagine, I’ve been so busy with our baby girl (who was a week late, born March 7) that I really haven’t had time to blog (or read, or crochet, or sometimes cook). But that’s OK, I’ve enjoyed lots of baby snuggles during the past few months.

I was fortunate enough to have a little over five months off of work with my daughter. During this time, I got to experiment with making my own baby food (she’s now discovered she likes the organic pouches best, but she’ll still eat my food).

I started off making making her cereals: rice and oatmeal.

Oatmeal

Oatmeal

The oatmeal wasn’t so bad, but the rice was a booger to make. I started off trying to process it all into a powder before I cooked it, but quickly learned that wasn’t the best method. Cook and THEN process is best!

As you can kind of see in the picture above, I used an emulsion blender. Best thing ever! No need to dirty a food processor or blender when you can do it all in the cooking vessel or storage bowl! I used the cup that came with my emulsion blender.

Fruits and vegetables were much easier. I used fresh when I could find a good sale and frozen when I couldn’t. Aside from very ripe bananas, avocados, and pears, I steamed everything on the stove and then pureed. I mashed and pureed the bananas, avocados, and pears raw.

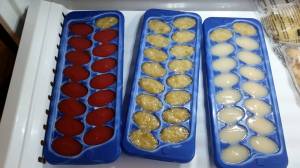
Once I got the food processed and thinned (with cooking water) to a consistency that I liked, I poured it into ice cube trays and froze it overnight.

Plums, Bananas, and Pears

Plums, Bananas, and Pears

I started having so much fun with making my daughter’s food that it almost became an obsession (my husband stepped in and told me I needed to slow down).

Two-thirds of our freezer drawer full of baby food.

Two-thirds of our freezer drawer full of baby food.

If you’re trying to decide if you want to make your baby’s food, try it! The process isn’t awful (unless you leave the emulsion wand in the blending cup with food and it crashes to the floor), you know what’s in your baby’s food, and it’s cheaper than buying jars and pouches from the store.

Thanksgiving-y Foods

Hey, y’all! Sorry it’s been forever since my last post. I have a good excuse (really, I do). Around the middle of July, my husband and I learned we’d be expecting our first little one March 1. All-day sickness and sleepies hit me hard during the first half of my pregnancy, so I really didn’t cook much at all. I’m feeling a little better and doing a little more now, though standing to cook for a long period of time gets to my back (even with my anti-fatigue mats).

Over the past couple of weeks, I’ve baked a lot. I don’t know if it’s because I was hungry for fall/Thanksgivingish foods, or I was just ready for Thanksgiving in general. Here are a few recipes I tried (sorry I don’t have pictures this time).

Pumpkin Spice Muffins

1 (15 oz.-ish) box spice cake mix
1 (15 oz.) can pumpkin
1 bag cinnamon chips

Mix dry cake mix with pumpkin and cinnamon chips. Divide into lined muffin tins. Bake at 350 degrees for 15 minutes. Makes approximately 20 muffins.

I got this recipe from my mom, who got it from a co-worker. Neither my husband nor I are big on pumpkin, but we loved these. When I made them, I made a double batch to split between our home and both of our jobs. All of our co-workers raved about them!

Pork Tenderloin with Apple Cranberry Sauce

(taken from Baked in the South)

2 lb. pork tenderloin (not in a marinade)
1 tsp. salt
1 tsp. pepper
1/2 c. brown sugar
2 T. cider vinegar
1 tsp. ginger
1 tsp. cinnamon
1/4 tsp. red pepper flakes
1/2 c. dried cranberries
3 peeled and chopped Granny Smith apples

Season pork with salt and pepper and add all ingredients to crock pot. Cook on low for 6-8 hours until pork is tender. Serves 6.

I made this on my birthday. Usually we’d go out, but my brother-in-law and his girlfriend were coming over to spend time with us. My husband was the only one who really didn’t care for it (in fact, he said “Please don’t make this again”). The rest of us thought the flavor was good, but the pork itself was really dry.

I also made brownies with canned pumpkin (mix a box of dry brownie mix with a 15 oz. can of pumpkin and bake according to the directions on the brownie box). These became a little more dense the longer they sat, but fresh they had the consistency of a very thick mousse. They were a hit!

And now for the Thanksgiving yums…

When my husband and I moved into our own place, I felt like I needed to start contributing to Thanksgiving and Christmas dinners. This is the third holiday season I’ve cooked something. And for some reason, this Thanksgiving, I decided to bake my first pie. Yikes! Luckily, I had a good recipe in reserve. My aunt, who, in my opinion, is one of the best dessert makers, sent me a recipe for an apple-cranberry crisp pie. I intended to make this two years ago for a pie contest at my husband’s work, but I never got around to it. The recipe has been sitting in my email for the past two years. Until this Thanksgiving.

Apple-Cranberry Crisp Pie

Use whatever crust you wish (I used a store-bought Pillsbury crust). Press into the bottom of a 9-inch pie plate.

Filling:
3/4 c. sugar
2 T. all purpose flour
1 tsp. cinnamon
1/4 tsp. salt
5-6 c. thinly sliced, peeled apples (I did about 7 cups and used a mixture of Granny Smith and Honeycrisp)
1 1/2 c. cranberries (can use fresh or frozen, I used fresh)

Topping:
1/2 c. rolled oats
1/3 c. brown sugar
1/3 c. all purpose flour
1/4 c. butter or margarine, softened

Heat oven to 425 degrees. Prepare pie crust as directed, using 9-inch pie plate. In a large bowl, combine sugar, 2 T. flour, cinnamon and salt; mix well. Add apples and cranberries; mix well. Spoon into crust lined pan. In a small bowl, combine all topping ingredients; mix with fork or pastry blender until crumbly. Sprinkle over filling. Bake at 425 for 35-45 minutes, or until apples are tender and topping is golden brown. Cover edges of crust with foil after 15 minutes of baking to prevent excessive browning.

(Don’t forget to put the pie on a baking pan lined with foil to catch the juices if your pie filling runneth over! It saves you from having to clean a mess in the bottom of your oven.)

This recipe was a huge success! Everyone who tried it loved it. It even got my grandma’s seal of approval (my grandma is queen of pies in her area). My brother-in-law, who is nice to me even if I make something he doesn’t particularly care for, asked me if I had the ingredients to make another pie. I think he wants one all to himself…

And then there was the squash casserole. I made it for my dad, as he is limited on his carb intake. The casserole I made is adapted from Paula Deen’s Squash Casserole recipe.

Squash Casserole

6 c. diced yellow squash and zucchini
canola oil
1 onion, chopped (I used 2 c. frozen onion just because I don’t like chopping them)
4 T. butter
1/2 c. sour cream
3/4 tsp. salt
1/2 tsp. pepper
1/2 tsp. garlic powder
1 c. grated Colby jack cheese
1 c. crusted Club or Ritz crackers (I used Club Multi-grain)

Preheat oven to 350 degrees. Saute the squash in canola oil over medium heat until it is slightly tender to the touch. Line a colander with a couple of layers of paper towels. Place the cooked squash in the lined colander and squeeze out extra moisture. Set aside.

In a medium skillet, saute the onion in butter until translucent. Remove from pan and mix with all other ingredients, except cracker crumbs. Pour mixture into a greased casserole dish and top with cracker crumbs. Bake 25-30 minutes. Used as a side dish, can serve 4-6.

Everyone really liked this too! My dad said that the squash wasn’t quite mushy enough for him, so I’ll definitely cook it longer next time.

And, yes, I think there will be a next time. Since the pie and casserole went over so well, I think I’ll continue to make them for future Thanksgivings!

Hawaii Vacation Find – Ruby’s Diner

Around this time last month, I was walking across a stage to a platform in the middle my school’s event center to receive my Master’s hood. A few days later, I was on a plane with my in-laws en route to Maui. Since we returned from Hawaii three weeks ago, I’ve done nothing but veg. Eating, playing video games, watching TV. My husband kept getting after me to write this blog post, but I just didn’t feel motivated enough to do it. Not that I really do now – How long does it take to get over graduate school stress and jet lag? – but I figure it’s one step toward getting back into my normal routine. So here’s my Missouri Foodie Goes Hawaii post. 🙂

The thing I was the most excited about doing while we were in Hawaii was eating. Fresh fruit, fresh seafood, local coffee. Oh, and don’t forget the food at the luau! It was all good, but it wasn’t mind-blowing, which is kind of what I was expecting. Yes, the mango was better than I can get here, and it was interesting trying papaya, passion fruit, and lychee for the first time. My mahi-mahi was good, but I don’t think I would have liked it without the tartar sauce (it had lots of dill and was very yummy). I did not get to try Kona coffee, which could have been my mistake, but I did have coffee that was grown in Lahaina, close to where we were staying. It was also good, but the coffee that I had at LAX was better. And my favorite thing at the luau was the coconut pudding. Oh, and the purple sweet potatoes.

Wow, that sounds like kind of a downer. The food was good, it really was. I think I just had higher expectations, you know? I mean, it’s Hawaii.

Not including the luau, we ate out three times: when we arrived, after we got back from our day trip Oahu, and on our free day. Two of those meals were at the same restaurant: Ruby’s Diner.

IMG_0236

We had not planned on going to Ruby’s the first time. While we were at Walmart picking up some clothing for my sister-in-law and her husband (their luggage had been sent to Las Vegas) and breakfast for the next day, I asked the fitting room attendant for restaurant recommendations (we were all pretty hungry, as we hadn’t eaten a whole lot that day). He suggested Koho’s, which was in a mall, a couple of doors down from Ruby’s. We got to Koho’s to find that they had a 30-45 minute wait (Did I say we were hungry?). Seeing Ruby’s on the way in, we decided to go there instead. And I think we’re all (except my father-in-law – he didn’t eat with us either time) pretty glad we did. We got seated immediately and had excellent service for it being our server’s first night on the job. Four of the six of us ordered the Luau Sliders, and they were absolutely delicious!

IMG_0238

The sliders are served on a King Hawaiian roll with cheese, bacon, an onion ring, and what Ruby’s calls plum sauce (it tasted more like BBQ sauce to us). Even though they’re a little greasy, they’re near perfection, and probably the best burger I’ve ever eaten (they even reheat pretty well!).

I mentioned that we had great service, which carried over to our next visit. The manager remembered us, remembered where we were from, and even sat us at the same table (we had a different server, but she was good too!). I’ve never been a “regular” anywhere, but I began to feel like I was one at Ruby’s.

In doing some research, I discovered that Ruby’s is a chain that is in Hawaii and California. So if you can’t make it to Hawaii right now, visit one of their California locations. I don’t know if they’ll have the Luau Sliders on the menu, but if not, see if they can still make them for you!

Homemade Sloppy Joes

Any more, I know better than to ask my husband what he wants me to make for dinner. He’ll either tell me to pick something, and he won’t eat seconds if he doesn’t like it, or he’ll mention one of his three favorite foods: ribs, meatloaf, or sloppy joes. I think I surprised him last night when I said I was going to make sloppy joes for dinner (especially after telling him that I had a long boring day and didn’t really feel like cooking).

You may be wondering what’s so special about sloppy joes. All you have to do is open a can of Manwich and pour it in, right? Wrong. You see, my husband’s grandmother made her sloppy joe sauce, not entirely from scratch (I’m guessing she used store-bought ketchup just like I do), but not from a Manwich can either. This recipe was passed down to my mother-in-law, which was then passed on to me after my husband and I got married. The thing is, I’ve copied the recipe a few times and can never find it when I need it – like when my brother-in-law and his girlfriend are over for dinner and it doesn’t taste or look quite right (sorry guys!). I didn’t have the recipe in front of me last night either, but my concoction tasted just as good, or at least I thought so.

So here’s my take on what my husband’s family calls “GaGa’s sloppy joes”.

Sloppy Joes

Sloppy Joes

Serves 6-8

1 1/3 lb. ground beef
2 T. flour
1 c. water
1-1 1/2 c. ketchup (this is more or less to taste)
2 T. brown sugar
1 T. Worcestershire sauce

Brown ground beef in a large skillet. Drain. Return ground beef to skillet. Add flour and mix. When flour is combined, add water and stir. Add ketchup (enough to make the mixture turn slightly red – you can always add more later if it isn’t tomatoey or tangy enough for you), brown sugar, and Worcestershire sauce. Stir until ingredients are combined. Cook on medium heat, stirring occasionally, until sauce thickens.

And that’s it! Serve on a bun, on tortilla chips, or whatever you typically eat sloppy joe meat on.

Enchilada Lasagna Fail

Well, I’m back. I finished my classes at around 1 a.m. on May 4, so now I have tons of time to cook and blog (yeah, right). At least I don’t have to worry about classes getting in the way, because I’m DONE done. Graduation is on Saturday.

With classes out of the way, I spent last weekend browsing yummy looking recipes on Pinterest to make for dinner this week. I added Cheeseburger Soup (even though it’s in the mid-80s), Brown Sugar Spiced Pork, Thai Chicken and Noodles, and Enchilada Lasagna to the line-up, along with some of our favorites. Out of all of the dinner ideas, I was looking forward to the Enchilada Lasagna the most, so I made it for dinner Monday night.

Picture taken from Mogwai Soup

Looks good, doesn’t it?

This meal was a huge disappointment. HUGE. For starters, mine didn’t look at all like the picture from Mogwai Soup. It looked like cat puke. And it was extremely salty. Almost inedible, salty. I guess I should have predicted that with the “cream of” soups and 2 teaspoons of salt in the recipe. Also, it didn’t have any spice to it. I thought the cumin might be enough, but nope. It was also kind of difficult to assemble. The chicken and tortillas kept sliding around when I added the soup mixture. Maybe I wasn’t supposed to spread it out?

Here’s the recipe, if you dare to try it.

***

Enchilada Lasagna

Ingredients:

2 tbsp of vegetable oil
1 lbs chicken breast, chopped to bite pieces
5 cups of Mexican blend cheese
1 can of cream of celery
1 can of cream of chicken
1 1/2 cups sour cream
1/4 cup canned and chopped green chilis (drained)
small corn tortillas
1 tsp cumin
2 tsp salt
1/2 tsp pepper

Brown chicken in a pan on 2 tbsp of oil. Season with salt, pepper, and cumin.
In a bowl combine cream of celery, cream of chicken, sour cream and green chillies.

Prepare the dish you will assemble the lasagna in. Put 1/2 cup of cream mix on the bottom of the baking dish and spread. Layer a row of tortillas followed with cream mix, chicken and cheese. You should be able to make 3 layers like this. Last layer doesn’t need chicken, just a ton of cheese. Bake at 425 degrees for 20 minutes.

***

Unless I majorly revamp this recipe (which I probably won’t, because I’m too lazy), we won’t be eating this again. It’s kind of sad, though, because my husband didn’t mind it. He thought it was a little salty and recommended adding tomato…sauce maybe? He didn’t specify. Just “tomato”. He also said he wouldn’t want it to be any spicier. Wimp. Then, he does like Mexican Villa (yuck).

If you are brave enough to try this, I’d love to hear from you. Especially if you made any changes to make it taste better.

A Different Kind of Fried Chicken

If there’s anything you should know about my husband, it’s this: he doesn’t like authentic Mexican food and he has to have some kind of dipping sauce with his food (ketchup, mayo, ketchup and mayo mixed, honey mustard, BBQ sauce, seafood sauce, eel sauce, etc.). He even dips his scrambled eggs in ketchup!

So you can imagine my surprise when he didn’t use any kind of sauce on the chicken I made for dinner last night. In his opinion, it had enough flavor that it didn’t need the sauce. This recipe was a success! It was also easy to make (3 ingredients, come on), and used ingredients that I pretty much keep on hand at all times.

So here’s what you do (and forgive me for not having a picture):
– Get your favorite cut of chicken and let thaw if frozen (I used chicken breast tenders).
– Grab two gallon size Ziplocs (or extra Shake n’ Bake bags, if you have any), put ranch dressing in one (I used Kraft Buttermilk Ranch) and Italian bread crumbs in the other. I didn’t measure. I just made sure I had enough to coat the chicken.
– Place chicken in Ziploc with ranch and mush around, making sure the chicken gets coated. Then remove the chicken from that Ziploc and place in the Ziploc with the breadcrumbs. Seal and shake, again making sure the chicken gets coated. Remove from bag and cook.

At this point, you can either bake your chicken or fry it. I pan-fried mine in some canola oil.

I served the chicken with green beans and new potatoes, cooked together with bacon, salt, pepper, and garlic powder.

So that’s it! Pretty easy. If you try it, I hope you like it. And let me know if you come up with any alternatives!

Crock Pot Cream Cheese Chicken

It never fails. Whenever I cook for my in-laws, it’s always a new (to me) recipe. I don’t know why. When my husband and I lived with my in-laws, I experimented with stromboli and breakfast tater tot casserole. When my brother-in-law came to visit us at our apartment, I made pancit canton. And when my parents-in-law came over to the house to watch the Super Bowl, I made crock pot cream cheese chicken. Fortunately for me, none of these were disasters, and they all became favorites.

At the insistence of my husband, I made the crock pot cream cheese chicken again a few nights ago – he just finished the leftovers today.

Crock Pot Cream Cheese Chicken

Adapted from Budget Savvy Diva

Serves 6

4 chicken breast halves or 8 chicken breast tenders
1/2 T. Italian seasoning
2 T. melted butter
1/2 t. dried onion flakes
1/2 t. onion powder
1/2 t. garlic powder
1/2 t. pepper
1/2 t. salt
1/2 of a 1 oz. packet of dry ranch dressing mix
1 can (10.75 oz.) cream of chicken soup
1-8 oz. package cream cheese
1/4 c. chicken broth

Put chicken, seasonings, and butter in crock pot. Cook on high until chicken is done. Shred chicken in crock pot. Add cream of chicken soup, cream cheese, and chicken broth. Continue to cook until cream cheese is melted and mixture is warmed through. Serve with your favorite pasta.

2013-03-02 19.34.13

When I made this for the Super Bowl, I made a couple of mistakes that actually worked for the dish: I added a full can of cream of chicken soup and full 8 oz. package of cream cheese (hey, extra sauce for the pasta, right?). I did, however, have to add extra seasoning to make up for the blandness. Half of a 1 oz. packet of dry ranch dressing mix did the trick. When I made this the other night (or I should say when my husband prepped it), I cut the amount of Italian seasoning in half, as a full tablespoon was a little much for my taste.

So now it’s perfect, for us anyway. I serve it with whole wheat penne – a 13.25 oz. box cooked, drained, and added to the crock pot and mixed with the cream cheese chicken.

Tip: Go ahead and use low-fat ingredients with this. I couldn’t taste the difference. Also, you  might want to serve with a sweeter side, as the dish is savory. We’ve used peas (as you can see in the picture) and carrots with a brown sugar glaze.

Arris Pizza – Republic Rd.

Tonight I was in one of my “I don’t feel like cooking” moods, so my husband and I went out. Actually went-to-a-sit-down-restaurant went out. We typically just get fast food, but, eh, I was feeling like a date night, so there you go. And for the first time in I don’t know how long, our meal was decided upon without the “What do you want? – I don’t care, what do you want?” The hubs wanted pizza. Not good for the diet (neither is the moscato I’m going to have after I finish this post), but whatever. After a brief conversation about lamb, gyros, and reference to a Facebook post made by a friend that said the gyros at Arris Pizza are “pretty tasty”, that’s where we decided to go. I’d heard nothing but rave reviews about it, so it had to be good, right?

(No pic of the building this time, sorry.)

With the exception of the addition of the gyro, the menu featured items one would typically find at an average pizza place: salad, sandwiches, and, of course, pizza. Only the pizzas listed on the menu were all specialty (well, I guess there was kind of a build-your-own option)…named after Greek gods. It was a little overwhelming trying to pick a pizza with so many different selections. We almost went for the Hercules (their version of a meat lover’s pizza), but decided on our usual beef and mushroom. And I’m glad that’s what we did, because I could accurately compare it to other pizzas we’ve had.

When our pizza came out, this is what we saw.

2013-03-07 19.06.11

Gasp! It’s thin crust!

And it was the best thin crust pizza I’ve ever had (compared to Pizza Hut and places that are known for their thin crust, such as McSalty’s and WannaGetta Pizza)! The crust was crispy, not soggy, and tasted like it had a hint of butter and Parmesan (or maybe it was the cheese).  But there wasn’t much sauce. Not that it needed it. The toppings had so much flavor that the crust could have been cardboard and I wouldn’t have cared. I didn’t even need to add Parmesan, that’s how good it was. And somehow….somehow, they ground the beef so fine that there was a layer over the entire pizza. With this pizza, every bite had a bite of beef, instead of having to take two or three bites, as with other pizzas, to get a larger piece of beef. For being a simple beef and mushroom pizza, this pizza was incredible (and telling you about it makes me want to dig into the leftovers in the fridge, even though I’m stuffed full).

2013-03-07 19.06.50

If you haven’t been to Arris yet, definitely go soon! Maybe when we go back, we’ll branch out and try the Hercules…then again, maybe not.

Now for that moscato…

Family Dinner Friday – Mandarin Chicken Skillet

Nearly every Friday, my husband and I get together with his side of the family for dinner. We used to go out to eat (and still do on occasion), but now that a few of us are dieting, my mother-in-law cooks at the house. This past Friday, she made Mandarin Chicken Skillet.

2013-03-01 19.23.24

For having broccoli in it (I’m not a huge fan), it wasn’t half bad. It definitely wasn’t as sweet as we expected it to be – it’s more like an orange broth than a sweet and sour sauce – but I’d make it again. Well, I would if my husband liked it. My mother-in-law said a little bit of brown sugar could probably add the sweetness the dish was lacking.

Mandarin Orange Skillet
Makes 4 servings

Taken from AllRecipes

1 cup fresh broccoli florets
1 tablespoon butter
2 pounds skinless, boneless chicken breast meat – cubed
1 1/2 cups sliced fresh mushrooms
3 teaspoons all-purpose flour
2/3 cup water
1/3 cup undiluted, thawed orange juice concentrate
2 cubes chicken bouillon
1 (11 ounce) can mandarin orange segments, drained

Place broccoli in a steamer over 1 inch of boiling water, and cover. Cook until tender but still firm, about 2 to 6 minutes. Drain, cool and set aside.
Heat butter in a large skillet over medium high heat. Saute chicken in butter until browned. Remove from skillet and set aside.
Saute mushrooms in skillet for 1 minute; remove from skillet and set aside. Stir in flour, water, orange juice concentrate and seasoning.
Heat to boiling, stirring. Simmer, stirring, for 4 minutes. Return chicken and mushrooms to skillet; stir in orange segments, green onion and broccoli. Heat through and serve.

(Note: I think we may have added a little bit more than the recommended amount of mushrooms.)

2013-03-01 19.45.09

Served with southern green beans (minus the almond slivers), spaghetti squash, and garlic bread.

And, yes, I even ate the broccoli!

Mr. Bigg’s – Division and Sherman

I had a lunch date with my friend/co-worker, Melody, today. We kicked around a few ideas of where to go and finally decided on Mr. Bigg’s (neither one of us had been there). It’s at the southwest corner of Division and Sherman, where Planet Sub (among other restaurants) was.

2013-02-28 12.28.44

The staff greeted us when we walked in and our server was quick about getting us our drinks and food.

Melody ordered the mostaccioli, and after some deliberation and asking our server for a recommendation (which she couldn’t really give because she hadn’t tried one of the meals), I ordered the tortellini.

2013-02-28 12.02.13

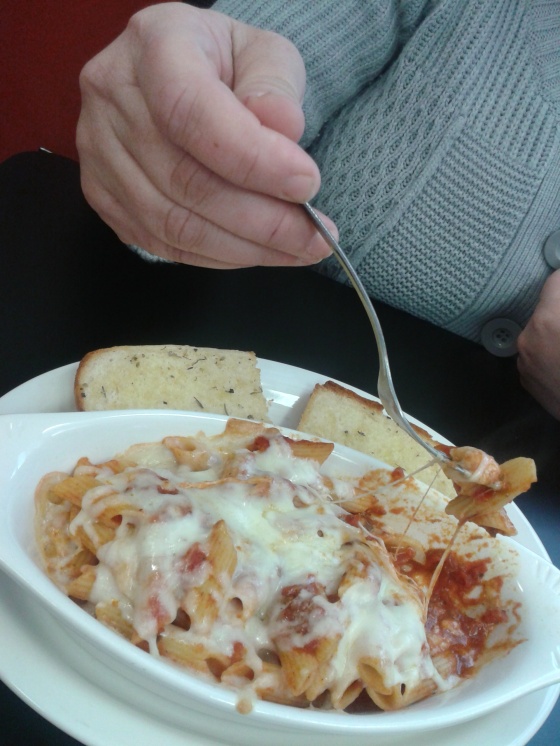
Melody’s hand (the only part of her she’d let me photograph) and her mostaccioli

2013-02-28 12.01.32

My tortellini

I don’t think the food was that great. The “beef” in the tortellini tasted like the “beef” in Chef Boyardee ravioli, and the sauce was watery and bland. For the price, $7.90, it really wasn’t worth it. I told my husband I could make better myself, and for being “fast” Italian, Fazoli’s is much better.

Mr. Bigg’s also serves pizza, which I feel I should try before I decide not to go there again. However, after we sat down, Melody struck up a conversation with a couple sitting next to us and asked them how their pizza was. They said it was so-so. My guess is, it’s just a so-so restaurant.